It is some time ago that is possible to use Virtual Machine(VM) in Windows Azure. A good example when you could use VM is build your own FTP Server hosted in Azure. The problem is that most products are using hard disk to store the data. The question is how you could access the data from your Web or Worker Role instances. One way is access the data via FTP protocol, the other, for example, using classic Windows files sharing.
FTP server installation
For this example, you can install your own FTP server in Azure (good guide is here), but it will be enough to start the virtual machine in the Azure and share one folder. The only thing you must set up are VM Endpoints. For the FTP Server you need, at least, all of displayed below. For the file sharing are only necessary the NetBIOSSession and SMB.
Startup task to create privileged user
Windows Azure Worker role is running in the cloud environment under the privileged user which don’t have a rights to access shared directories. What is necessary to do is creating the Startup task where we are creating a new user, which will be used to access shared directories. The user (and his password) below must match those which has Read privileges on shared folder.
@echo off

net user testftpuser /delete
net user testftpuser #StrongPassword /add
net localgroup Administrators testftpuser /add

echo Command ends with error code %errorlevel%
exit /b %errorlevel%
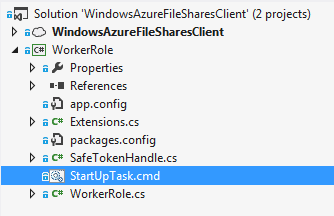
Copy the code below in the file StartUpTask.cmd which should be included in the project project where Worker Role to monitoring the shares will be implemented.
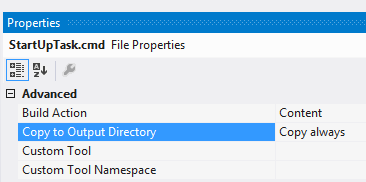
Additionally you must set Build Action as Content and Copy to Output Directory as Copy always on this file.
To ensure the task will be executed when to role is starting, add the task name as the Startup Task in the ServiceDefinition.csdef
<xml version="1.0" encoding="utf-8"?>
<ServiceDefinition name="WindowsAzureFileSharesClient" xmlns="http://schemas.microsoft.com/ServiceHosting/2008/10/ServiceDefinition" schemaVersion="2013-03.2.0">
  <WorkerRole name="WorkerRole" vmsize="ExtraSmall">
    <Startup>
      <Task commandLine="StartUpTask.cmd" executionContext="elevated" taskType="simple" />
    </Startup>
      ...
  </WorkerRole>
</ServiceDefinition>
Accessing shared directories with the impersonation
If you want to access the shared directories, you need to execute the code under the impersonated user. I implemented this as extension method ExecuteAs<T>.
        public static void ExecuteAs(this Action actionToExecute, string username, string password, string domain)
        {
            SafeTokenHandle safeTokenHandle;
            var returnValue = LogonUser(username, domain, password, 2, 0, out safeTokenHandle);

            if (returnValue)
            {
                using (safeTokenHandle)
                {
                    using (var impersonatedUser = WindowsIdentity.Impersonate(safeTokenHandle.DangerousGetHandle()))
                    {
                        actionToExecute();
                    }
                }
            }
            else
            {
                throw new Exception(string.Format("User {0} login failed", username));
            }
        }
With the help of method below, we are initializing the instance of the FileSystemWatcher class.
        public override bool OnStart()
        {
            new Action(InitializeFileWatcher).ExecuteAs(_username, _password, _domainName);
            return base.OnStart();
        }

        private void InitializeFileWatcher()
        {
            _fileSystemWatcher.Path = _pathToMonitor;
            _fileSystemWatcher.Created += FileSystemWatcher_OnFileCreated;
            _fileSystemWatcher.Renamed += FileSystemWatcher_OnFileRenamed;
            _fileSystemWatcher.EnableRaisingEvents = true;
        }
As usually you can find the complete solution here.


